Preloading the Hero Image on a Shopify to improve PageSpeed Insights Scores - New in 2021
Posted by Cameron Shaw on
There’s a new tool in the toolbox when it comes to optimizing the web performance of Shopify these days. It’s not even officially in the W3C spec yet, but it’s supported by most major browsers - and doesn’t hurt the rest - and is measured and recommended by Google’s PageSpeed Insights tool, which impacts your SEO rankings. In short - it’s a huge win for developers and Shopify partners who are always looking for new ways to reduce the load times of their clients’ stores, helping improve their on site conversion rate and drive revenue for the business.
It’s a great thing to do, which has a noticeable and measurable impact on the website’s performance. Here’s how you can do it in your shopify store:
How to pre-load the main hero image on the homepage:
Step 1: Find your Hero Image section
Start by finding the hero image section in the theme. It’s possible it may be in the top level theme settings, but more commonly it’ll be its own standalone section.liquid file.
Sometimes it's a section, either being called directly, aka a static section, like this:

Or it'll be a dynamically added section which can be added, re-arranged, or removed from the homepage through the Customizer. In this case I recommend spinning off a new version.
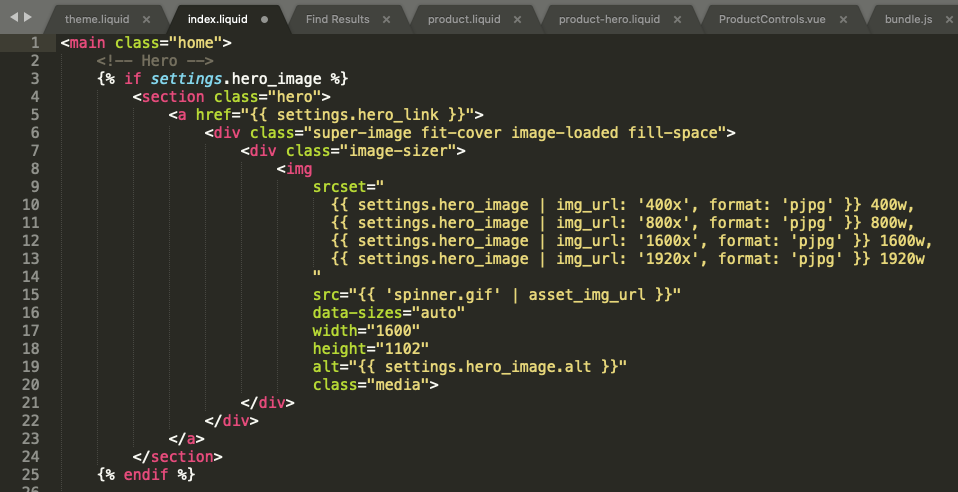
The section should look something like this and contains it's own {% schema %} data.

Sometimes the hero image is stored in the top level theme settings, and it'll be called directly in the index.liquid template (which renders on the homepage in the {{ content_for_layout }} tag), like this:

2. Add the html <link> tag to the top of the section
Now - we’re going to add a new html tag at the top of the file - pulling in the same image which will be loaded into the hero image or the first slide of a carousel.

You can read about this new tag features here. Hopefully you’re already responsively sizing your hero image, so you can use the identical srcset and sizes attributes in the corresponding imagesrcset and imagesizes attribute on the <link>.
Now for the magic. You might have been wondering how we’re going to get the link tag, which needs to pull from the variables stored in the section scope, into the <head> of the document, way before the section is shown?
3. Add a special character before and after the <link>
Fortunately, Liquid works great. Add a *** before and after the link tag, and then we’ll output the section in the <head>, but capturing it as a variable, then strip out the link and leave that in the <head>, and recombine the remaining parts and output that in the <body> where the hero image should be displayed.
Add the *** before and after the <link>:

4. Capture, Split, & Output the middle in the head
Now, in the <head> tag in the theme.liquid layout, just capture, split, and output the middle portion of the section:

5. Add the hero image to the homepage
Then, further down, where the content is rendered, add a conditional tag and output the remaining parts to include the hero image on the homepage only:

I'd recommend adding the same conditional logic to the part captured in the <head> as well. :)
The reason for the three part approach is that Shopify automatically wraps sections in a div which needs to be closed, so by capturing the part before the first *** we get the <div id="shopify-section-{{ section.handle }}" class="shopify-section {{ section.classes }}"> opening tag.
And there ya have it! You can also use essentially this same method to preload the primary image on product pages, collection pages, and blog and article pages. In those cases it’s often even easier since the image isn’t stored in a section, but attached to the main object of the template, like Product.featured_image, or article.image, so no splitting is necessary.

Thanks for reading! Hope you learned something new, happy optimizing!
Share this post
- Tags: performance optimization